One way to earn digital assets in 2023 is to mine them. To do this, miners use computing equipment. However, before launching a farm, you need to set it up. Special programs and platforms help in this. One of them is the Hive OS operating system. Hive OS in mining allows you to customize the farm and manage it. It also has functions of equipment monitoring, overclocking and remote control.
What is Hive OS
This is an operating system from the Linux family based on Ubuntu. It is designed specifically for cryptocurrency mining and was created by Hiveon. In October 2022, the system has the following features and specifications:
- Support for up to 200k computing devices.
- Overclocking of AMD and NVIDIA graphics cards (GPUs).
- Watchdog timer. This option automatically reboots hardware in case of hash rate drops and overheating.
- AutoFun. The function programmatically controls the operating temperature of devices.
- Access Rights Management. This option is intended for large mining farms that are operated by other people. It allows you to grant access rights to employees.
- Equipment monitoring. Hive OS users can monitor the operation of regs and ASICs.
- Remote monitoring. The company’s customers can operate ASIC devices and GPUs via smartphone.
How to download and install Hive OS
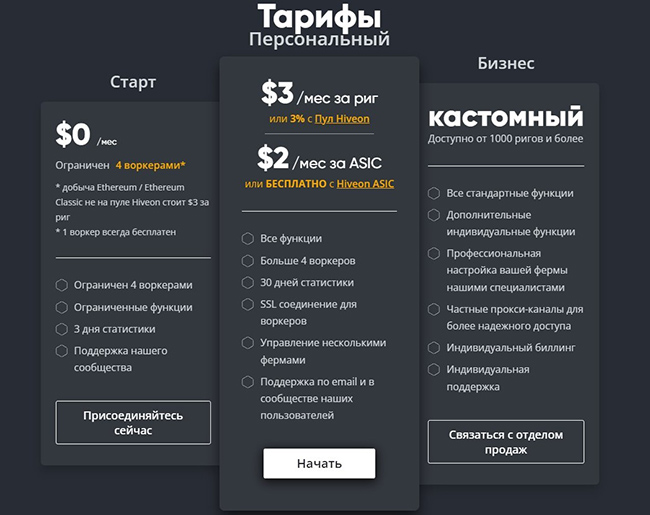
The company has developed many features in the system for cryptocurrency mining. But to access all the options, you need to buy a subscription. The free version of the platform supports in the work of 1 client vorker (up to 4 when using the Hiveon Pool mining pool). Also, some of the features will be blocked.
With a subscription all available functionality is opened. Its price is $3 for 1 rig with graphics cards (up to 19 GPUs). However, when mining in a pool from Hiveon, the company charges 3% on profits. The company only accepts cryptocurrency for payment. Payments are made by its partner service CoinPayments.
There are also customized offers for owners of large-scale mining farms with more than 1,000 regs. To find out more details, you need to contact the sales department on the Hiveon website.
There is a different payment program for ASIC owners. Each device costs customers $2. But when installing Hiveon’s firmware, users are given the option to work for free.
5020 $
Bonus für neue Nutzer!
ByBit bietet bequeme und sichere Bedingungen für den Handel mit Kryptowährungen, niedrige Kommissionen, hohe Liquidität und moderne Tools für die Marktanalyse. Es unterstützt den Spot- und Leveraged-Handel und hilft Anfängern und professionellen Händlern mit einer intuitiven Schnittstelle und Tutorials.
Verdienen Sie einen 100 $-Bonus
für neue Benutzer!
Die größte Kryptobörse, wo Sie schnell und sicher Ihre Reise in die Welt der Kryptowährungen beginnen können. Die Plattform bietet Hunderte von beliebten Vermögenswerten, niedrige Kommissionen und fortschrittliche Tools für den Handel und Investitionen. Die einfache Registrierung, die hohe Geschwindigkeit der Transaktionen und der zuverlässige Schutz der Gelder machen Binance zu einer guten Wahl für Trader jeder Ebene!
System Requirements
Hive OS spends less computing resources than Windows. This is one of the reasons to use the platform in mining. The system requirements of Hive OS as of October 2022 are summarized in the table below.
| Hardware | Minimum conditions | Recommended requirements |
|---|---|---|
| Processor (CPU) | Intel Core 2 / AMD AM2+ | Intel Core i3-3220 / AMD FX-6300 |
| RAM | ||
| Disk (flash drive) space | ||
| Video memory (VRAM) | ||
Writing a Hive OS image to a flash drive
To avoid reinstalling the operating system, the mining platform is launched from a third-party drive. To do this, you need to install it using the Hive OS image. It should be downloaded only from the official website of the developers in the Install tab. Otherwise, there is a chance of downloading an infected file to your computer. In October 2022, the image was downloaded as a ZIP archive weighing 1.1 GB. How to start mining on Hive OS – below.
Farm structure
It is necessary to deal with it for owners of large mining installations. A farm is a facility where computing equipment is stored. It can be located in different production facilities, rooms or garages. Each farm consists of vorkers – regs. It is a working computing system, which has:
- Motherboard (MP).
- Power supply unit (PSU).
- Processor.
- RAM (RAM).
- A storage device (HDD or SDD).
- Risers (often).
- Video cards.
Also in the Hive OS system, a vorker is each specific ASIC. The platform allows you to configure all devices individually.
Anmeldung
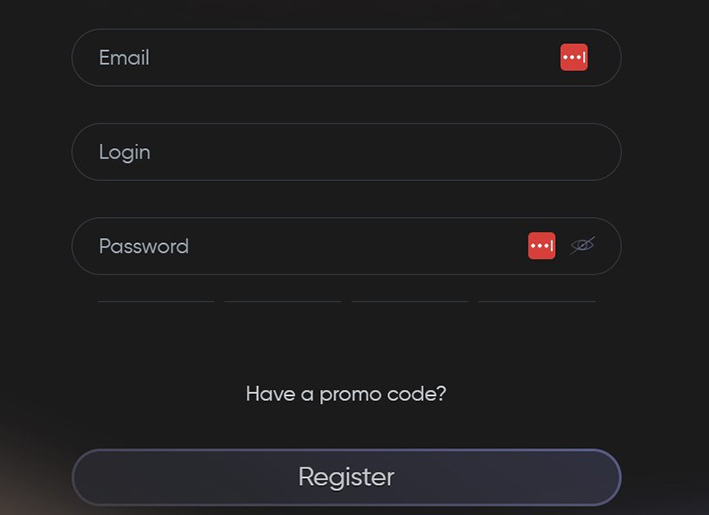
Most often the work with the operating system is done through the web-interface. But to access it, you need to register. Instructions:
- Go to the website.
- Click on Sign In.
- Specify e-mail, login and password. Enter the promo code (if available). It gives $10 to the account.
- Follow the link from the letter that will come to the specified e-mail. It is valid for 5 minutes.
- If necessary, specify personal data in the account settings.
After that, the registration will be completed. The platform will offer the client to connect two-factor authentication (2FA) for security. It is recommended to do this in the Google Authenticator mobile application.
Creating a farm and a vorker
These procedures are performed in the Personal Cabinet on the Hive OS website after registration.
It is necessary to create a farm to bind the operating system to the mining installations. And wokers are needed to designate each device separately. This will allow you to manage mining on a point-by-point basis.
To create a farm, you will need to log into your account. Next, customers click on the button in the form of a plus. A form with the following settings opens:
- Name. Here the user specifies the name of the mining farm.
- Timezone. Allows you to set the time zone in which the farm is located.
- Autotags. This function automatically signs all computing devices.
- Hiveon Pool Charging. If you enable this option, the mining will be done through the company’s pool.
After filling in the fields and selecting the settings, you need to click on Add. The client will be forwarded to a separate tab for creating wokers. Here you will need to select the equipment to be used. You should click on Add ASIC (add asic) or Add Rig (Rig with GPU). If the user chooses the former, the site will suggest:
- Connect ASIC devices via Hiveon Hub. The service will automatically find the hardware. The developers claim that the procedure takes 3-5 minutes. During this time, you can connect thousands of ASICs.
- Install firmware on the ASICs. This will increase their hash rate, but will remove the warranty.
And when clicking on the Add Rig button, the user will be prompted:
- Install Hive OS on each rig’s drive without an image. This is the easiest way.
- Write the mining system image to a flash drive.
- Connect the regs when the recorded distribution is available. To connect all devices separately, use Rig ID and password parameters. The service will create them automatically. You can also connect the farm to the whole system. For this purpose, Farm Hash – a unique identifier – is used. Hiveon also generates it by itself.
Image installation
This is done with the help of third-party programs. The developers of Hive OS recommend using the Ethcher utility. The procedure for installing and configuring mining on Hive OS:
- Download the image from the official Hiveon website (Install tab). It is downloaded as a ZIP file or via Torrent. There are separate images for ASIC devices, regular graphics cards and Vega architecture GPUs.
- Download the Ethcher program. It knows how to work with images on ZIP-files. In another case, unpacking may be required. For this you need a special utility, for example, WinRAR or 7-Zip.
- In Ethcher, click on Select Image. Specify the path to the mining system image.
- Click on Select Drive. Select the drive to install the image.
- Click on Flash.
After that, the recording will start. The procedure takes from 5 to 10 minutes.
The Ethcher program has alternatives. Among them are HDD Raw Copy Tool, dd, Ventoy, Multisystem and others.
Configuring Hive OS for mining
Also in the system there are additional parameters for cryptocurrency miners. You need to familiarize yourself with them before you start mining on Hive OS.
Account setup
Each user of Hive OS has a personal account on the site. For convenience, it can be customized. To go to the settings, you need to click on the login in the upper right corner. From the drop-down menu, you need to select Settings. As of October 2022, there are 5 tabs:
- Account. The first setting is Language. It allows customers to choose 1 of 13 available interface languages, including Russian. All other settings are personal. Here the user specifies nickname, full name, e-mail, phone number and contacts in messengers.
- Password. This tab is intended for changing the password. To do this, enter the old one, specify and repeat the new one, and then click on Update Password. The password will be changed.
- Authenticator. Here users connect two-factor authentication (2FA). To do this, you need to turn the toggle switch to the right, and then specify the code in the corresponding field for confirmation. It will come to your e-mail. You just need to open Google Authenticator and scan the QR code.
- Sessions. This tab displays the IP address of the current session. You can also generate an API here.
- Events. This page allows you to track events that occur with the account: registrations, authorizations, email confirmations, and so on.
Setting up a farm
In Hive OS, clients create them in an indefinite number.
Different settings can be applied to each individual farm. They apply to all connected wokers.
To get to the settings, you need to select one of the farms and click on Settings. The following settings and functions are presented here:
- Name. The name of the mining farm.
- Farm Hash. A unique identifier for connecting wokers. It is rarely used in October 2022.
- ASIC Configuration Files. This option is needed to manually bind asics to the farm.
- Tags. Here the client can add tags for the Workers. This will help him in searching for hardware.
- Timezone. Function for setting the time zone.
- Notification. Here users leave Telegram and Discord contacts to receive notifications about the farm’s work.
- Electricity Price. The parameter is needed to calculate the cost of energy consumption in fiat currency. Here you need to specify the price for 1 kWh of electricity. It can be entered in different currencies. To do this, it is enough to specify its ticker symbol after the price with a space (for example, 5.5 RUB).
- Hardware Power Consumption. This is the power consumption of computing equipment. When connecting Workers to the farm, it is calculated by itself. However, the user can specify the power consumption manually.
- Power Supply Unit Efficiency. During the operation of a power supply unit, a part of electricity is lost. Therefore, their quality is determined by the efficiency indicator. It reflects the efficiency of the power supply unit. The parameter is intended for manual entry of efficiency. This allows you to more accurately calculate the power consumption of a mining farm.
There is an Advanced Settings button at the bottom of the settings page. Clicking on it will open additional parameters. Here the user can transfer the rights to the farm to another person or delete it.
Setting up the Warker
When mining on the Hive OS, clients set separate parameters for regs and ASIC devices. To go to the settings, one must first open the Workers tab and then select the worker. Next, the user clicks on Settings and sees the following basic settings and features:
- ID. The unique identifier of the Rig or ASIC.
- Name. The name of the vorker.
- Description. Description of the mining device.
- Password. Here you can change the password for accessing the Worker.
- Resend All Configs. This function allows you to create a file with settings. It can be applied to other hardware.
- GUI on Boot. Enables the system GUI.
- Maintenance Mode. This is the maintenance mode of the vorker. If you enable it, the device will not participate in cryptocurrency mining.
- Login Screen. If you activate this function, then access to the Worker console will be blocked. After enabling it, you will need to restart the hardware.
- VPN. Allows you to redirect traffic through a third-party server. The function is able to provide anonymity in the network.
- Remote Access. A separate tab for configuring remote access to the vorker.
How to start mining on Hive OS
After installing, connecting the equipment and customizing the platform, you can proceed to start crypto mining. But first you need to create storage for coins and deal with flight sheets.
Creating a wallet
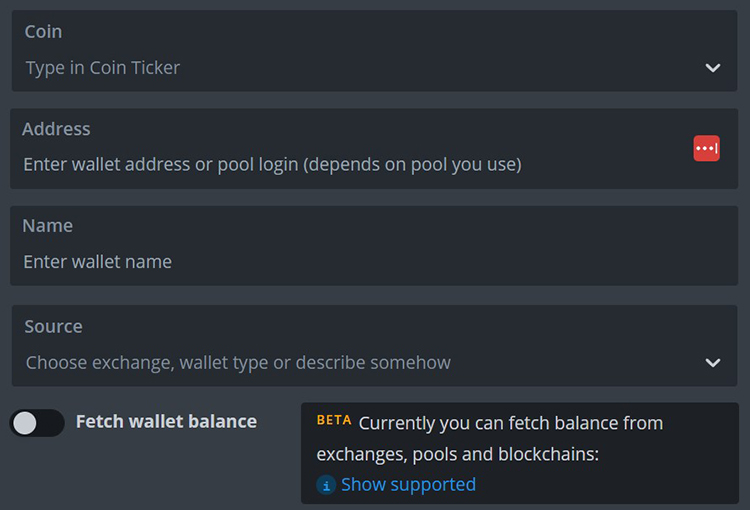
A crypto vault is a program for interacting with the blockchain. It is needed to host coins and tokens. In mining, a cryptocurrency wallet is needed to receive the mined digital assets. In Hive OS, you can connect most of the storages. To do this, you need to:
- Go to the Wallets tab.
- Click on the Add Wallet button.
- Select a coin, specify the address of the wallet (or pool), its name and source – the exchange.
- Connect the Fetch Wallet Balance feature. It displays the balance of a third-party wallet in the Hive OS mining system. In August 2022, the option was in beta testing.
- Click on Create.
You can also create a global wallet in the Wallets tab. This is a single storage for all mining farms at the same time. Such a wallet must support all mined coins.
Creating a fly sheet
This is a configuration file with settings that can be applied to wokers. Flight Sheets are created in the Flight Sheets tab. Here the user needs to click on Add Flight Sheet. After that he will see the following settings:
- Coin. The client will need to select a coin. The list of available wallets depends on it.
- Wallet. Now it is necessary to choose one of the previously created wallets.
- Pool. Here you need to specify a mining pool. If necessary, you can choose 2-3. If the first specified pool is unavailable, the system will switch to the next one.
- Miner. In this field you need to specify a mining program. Hive OS supports most of the existing software. The full list is available on the official website.
- Name. Name of the flight list.
- Add Miner. This additional feature allows you to add mining programs. It is necessary for crypto miners who apply several software at the same time.
After filling in the fields, you can create and save the flight list as a file or copy it to the clipboard. And to apply the settings, you just need to click on Create Flight Sheet.
Start mining
The system offers users tools for efficient mining of digital assets. After configuring Hive OS for mining, you can start the hardware. To begin with, you will need to select a farm and a vorker. Next, the miner enters the Flight Sheets tab and clicks on the button in the form of a rocket. From this moment, the launch of cryptocurrency mining will begin. The procedure will take 2-3 minutes.
Overclocking graphics cards in Hive OS
When producing graphics processors, there are errors in the stability of their work. Therefore, companies intentionally underestimate the computational potential of GPUs. This ensures stable operation of graphics cards and reduces the number of factory defects on the market. But users of graphics adapters are able to overclock them to the limit of their capabilities. In mining digital currencies, this increases the hash rate of graphics cards by 10-20%. Opportunities for overclocking are available in the Hiveon system.
Nvidia
After test setup and running the miner on Hive OS, you can accelerate the GPU in the regs. To do this, you need to stop mining digital currencies and go to the main page of the site. Next, you will need to select a mining farm, and then a rig with graphics cards (vorker). Opposite each video adapter there will be a button in the form of a speedometer. Clicking on it will open a form with GPU characteristics.
Also in the Worker menu there is a similar icon labeled All. This option allows you to accelerate all graphics cards in the Rig at once, if they are the same.
Overclocking settings for graphics adapters from different manufacturers (NVIDIA, AMD) are different. This is due to the difference between the system shells of the devices. To accelerate video adapters from NVIDIA, the following basic characteristics are available:
- Core Clock. This is the clock frequency of the graphics processor cores. By default it is equal to 0. When mining ETH, clock frequency overclocking has little effect on the hash rate.
- Memory Clock. When mining most coins, video memory is a priority characteristic. The hash rate largely depends on it. Memory Clock is the frequency of video memory. In Hive OS its value is 2 times higher than in Afterburner – a program for GPU overclocking. This is a peculiarity of the system.
- Fan. The user needs to manually add the speed of rotation of the coolers. This value is specified in percent. But if the AutoFun option is enabled in the system settings, it should be set to 0 when overclocking.
- Power Limit. This parameter is responsible for power consumption. More often it is reduced by 10-20% to save electricity. In Hive OS you can set the minimum, optimal and maximum values. To do this, they are entered through commas in this format: 100, 120, 140.
Before overclocking video cards, you need to know the factory values of their characteristics. Also, the procedure should be approached responsibly. Raise and lower the values step by step. Otherwise there is a probability of GPU breakdown.
The Hive OS system has overclocking limits for each individual video card. The function helps the user not to make a mistake. However, you should not rely on it completely.
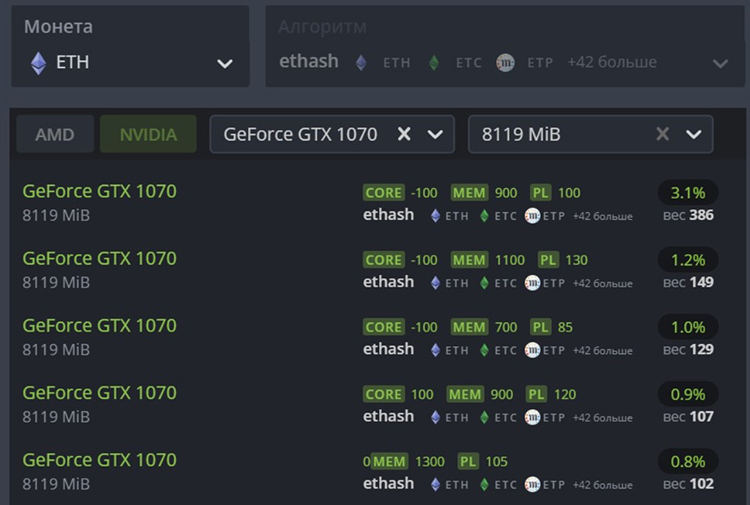
The mining platform also offers popular configurations of other users. They are located in the Popular Presets tab. It is enough to choose a suitable preset and install it for your graphics adapters.
AMD
Video cards from this manufacturer have more settings for overclocking. In them, you can change the voltage supplied to individual hardware elements. Available overclocking parameters for cards from AMD:
- Core Clock. Here you can specify the frequency of GPU cores.
- Core Voltage. This setting allows you to limit the voltage in the cores. This will reduce power consumption, but may affect the stability of the GPU.
- Memory Controller Voltage. In October 2022, this parameter is used for NAVI series video adapters. It is needed to change the memory controller voltage. It reduces power consumption, but can affect the stability of the GPU.
- Memory Clock. Video memory clock frequency.
- Memory Voltage. Supply voltage for GPU memory. The value should be changed carefully.
- Fan. When AutoFun mode is running, it remains unchanged.
- Power Limit. Power Limit.
All values for AMD GPUs are set in absolute terms. If the user wants to raise the clock frequency of cores from 1000 to 1100 Mhz, he will specify 1100. And for NVIDIA graphics cards a relative value is entered (for example, +100 Mhz).
The main mistakes when overclocking video cards
Running a miner on Hive OS after overclocking is a crucial moment. If you overclock carelessly, you can break video cards. Therefore, it is necessary to specify the main mistakes and recommendations during the procedure:
- Forgotten Power Limit setting. If you leave it unchanged, the system will set the maximum possible value. Because of this, the equipment will consume more electricity and overheat faster.
- Voltage parameters on AMD graphics cards. For each GPU model, the values are different. Therefore, it is recommended to set the voltage according to the official settings. Another option is to familiarize yourself with the experience of users on thematic forums.
- Overclocking should be done step by step. If you sharply increase the clock speed of the cores by 50%, the video card will crash at best. And in the worst case it will lead to its breakdown. You should overclock the device by 1-3% and then check the work of the GPU.
How to control the Rig after customization
You can control the mining equipment from the browser version of the Hive OS application. Mobile software has also been developed for remote control. It is available on iOS and Android smartphones and tablets.
The mobile apps have all the same features as the browser version.
Updating drivers for the video card
Manually, this procedure is only performed for NVIDIA GPUs. Instructions on how to update drivers:
- Check the installed version. To do this, go to the Worker and find the OpenCL form. The version of the installed drivers is displayed here.
- To find out their latest modification. To do this, you will need to click on Remote Access at the top of the page, and then on Hive Shell Start. This will launch the console.
- Open the Hive Shell window.
- Type nvidia-driver-update -list. The program will then display the available driver versions.
- Type apt update and then nvidia-driver-update. It will start updating the driver to the latest version. The procedure will take 2-3 minutes.
AMD graphics card drivers are updated together with Hive OS. To install its new version you need to:
- To the left of your login, find and click on Upgrade or Downgrade.
- Select the latest version of the system.
- Click on Upgrade Now. This will start the upgrade, which will take 2 minutes.
Advantages and disadvantages of Hive OS for mining
| Pros: | Minuses: |
|---|---|
| The mining system is easy to install, set up, and run | Sometimes there are failures in mining when connecting equipment via Wi-Fi |
| Hive OS supports most crypto mining pools and programs | The mining farm depends on Hiveon servers to operate |
| Quality translation of the site into Russian | If a miner has more than 4 wokers, he will have to pay for all the following ones |
| The system is able to work with different equipment at the same time | |
| Ability to remotely control the farm | |
| You can work with Hive OS from a recorded image on a flash drive | |
| There are tools for overclocking video cards |
Zusammenfassung
Hive OS is a Linux-based operating system for mining digital assets. It has a lot of features that facilitate crypto mining. To work with it, you just need to install the image on a flash drive. Then it remains to run the system on regs or ASIC devices. It works with different hardware at the same time.
You have to pay for the functionality of Hive OS if the user uses more than 4 rifles. Each next connected rig costs $3 and ASIC costs $2. But customers can save money by using the Hiveon Pool mining pool. Then they pay 3% of their income from the regs, and with ASIC devices they are connected for free.
Häufig gestellte Fragen
❔ How can I start Hive OS from a flash drive if I have another system installed on HDD (SSD)?
To do this, you need to go into BIOS and change the boot priority. Most often the procedure is as follows: open the Boot tab and then Boot Device Priority. Next, you will need to find the flash drive and move it to 1 line.
👀 Does Hiveon offer a referral program?
Yes, under its terms, customers invite other users and get in 10% of their payments. In return, referrals are paid $10 for signing up with a promo code.
😎 What can I mine with Hive OS?
The system supports most quoted coins with mining capabilities. In October 2022, ETC, RTM, XMR, and BTC are popular.
💻 When did the Hive OS mining operating system appear?
The developers launched it in the fall of 2017.
😁 Does Hive OS have a competitor?
It is Rave OS – a similar operating system with its own advantages and disadvantages. It is cheaper but has less functionality.
Befindet sich ein Fehler im Text? Markieren Sie ihn mit Ihrer Maus und drücken Sie Strg + Eingabe
Autor: Saifedaner Ammouseinem Experten für die Wirtschaft der Kryptowährungen.


